 Video on Patreon
Sunflower field
6 August 2026
Video - Level ◆◆◆
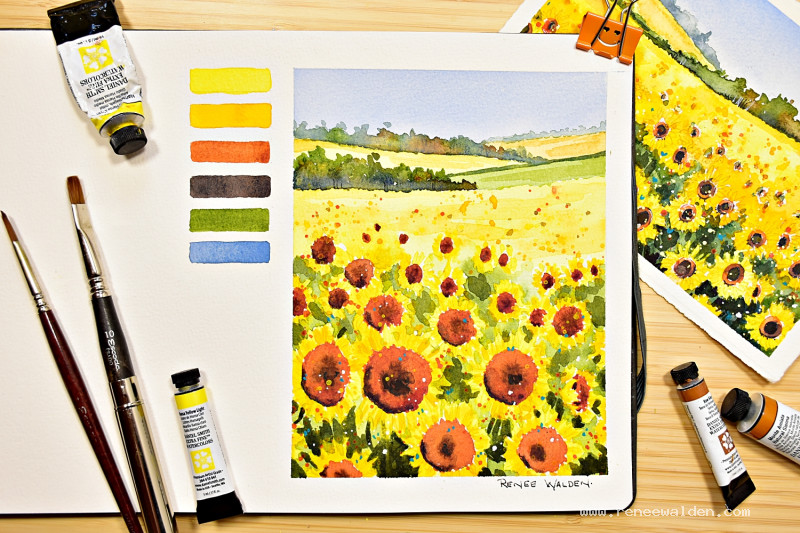
Here's something very sunny and cheerful - a field of sunflowers.
The idea in this lesson is to keep the sunflowers free and loose, and not spend hours painting every single petal. Rather we focus on bold brush marks and colour variations, with negative painting to bring everything into focus.
I also to show you how to create a sense of depth in a scene like this one - with detailed larger flowers in the foreground, changing to less detail in the mid-ground, and finally no detail at all at the back. I'll explain how to use warm and cool colours to add extra depth.
Happy painting!
Video run-through...
About This Painting
A field of sunflowers — cheerful, loose, and painted with deliberate freedom. The composition moves from hazy background fields through increasingly detailed and saturated sunflowers as they come toward the viewer. No masking fluid is used; instead, the greens are painted in two passes of negative painting to separate and define the flowers. The whole painting rewards a relaxed approach — the goal is painterly and spontaneous, not botanical.
A traceable drawing is available in the lesson description.
The Pencil Drawing
Fill most of the page with sunflowers, getting larger as they come toward the foreground. Vary the angle of each flower head — some facing toward you, some sideways — for variety and energy. Once the drawing is done, lighten everything with a kneadable eraser, especially in the flower areas where transparent yellows won't cover pencil marks well.
Colours to Prepare
- Cobalt blue — for the sky
- Natural sienna — pale, for the wheat-coloured back field
- Cool yellow (Hansa yellow medium or lemon yellow) — for the background sunflowers
- Warm yellow (Hansa yellow deep or Hansa yellow medium) — for the foreground sunflowers
- Sap green — for fields and foliage
- Green gold — for the bright first pass of foreground greens
- Quinacridone sienna — for warm accents in tree lines and centers
- Burnt umber — for sunflower centers
- Ultramarine blue plus burnt umber — for the dark shadow centres
- Cobalt turquoise or lavender — opaque, for final cool accents
Painting Order
Work from back to front: sky → back fields → background sunflowers → tree lines → foreground sunflower yellows → sunflower centers → first green pass → second green pass → details and splatters → cool accents.
Sky
Wet the sky area with a flat brush, including over any background trees, and avoid the light-coloured field below. Drop in a simple, flat cobalt blue wash — keep it plain so it doesn't compete with the busy foreground. Let dry naturally.
Back Fields
Paint the wheat-coloured strip with pale natural sienna. Add a cool yellow wash for the distant sunflower field — pale and low in saturation. Paint a simple green strip for the green field, keeping the bottom edge slightly uneven to suggest flower heads. Let each dry before moving to the next.
Sunflowers: Yellow Passes
Start with the cool yellow (Hansa yellow medium) across the entire sunflower area, painting all the way to the foreground. While still wet, drop in some warm yellow toward the front. Once this is partially dry, come back in to define individual petals on the mid and foreground flowers — loose marks, not fussy. Use a larger brush than feels comfortable to keep things free. Increase colour saturation toward the front. Leave the centers unpainted for now.
Tree Lines
Paint three tree lines of increasing detail and saturation from back to front:
- Back tree line — very pale cobalt blue with a tiny touch of sap green. Drop in clean water for soft blooms. Barely there.
- Middle tree line — slightly greener, a touch of ultramarine for granulation, more shapey marks at the top. Drop in wet sap green for blooms, plus a touch of quinacridone sienna as a complement to enliven the green.
- Front tree line — sap green, more saturated, larger shapes, ultramarine toward the base, quinacridone sienna accent. Keep the kiss line between the tree line and the sunflowers uneven so flower heads appear to poke up into it. Allow to dry naturally so blooms form fully.
Sunflower Centers
Mix three browns: quinacridone sienna (reddish), burnt umber, and ultramarine with burnt umber (dark shadow). Start at the back with a smaller brush; use a larger brush toward the front. Paint the reddish base first, shaping the petals into the center as you go — each center is slightly irregular and not a perfect circle. Once partially dry, add burnt umber in the middle, then the dark shadow mix on the left and underneath. The focal-point flower in the foreground gets the most attention.
First Green Pass: Bright Negative Painting
Mix sap green and green gold, well diluted. Paint around the flower petals to separate them from each other and from the background — negative painting. Go over some yellow freely; the goal is to pull out petal shapes, not to be tidy. Use both colours alternately for variation. Soften any harsh edges into the blurry background area. Keep it loose; if this step gets too tight, the whole painting stiffens.
Second Green Pass: Dark Negative Painting
Mix sap green with a little ultramarine and a touch of quinacridone sienna for a darker, richer green. Use this to suggest stalks and leaves between flowers — imagine the shapes of leaves and paint the shadows around them rather than the leaves themselves. Work darkest in the foreground and progressively add more water as you go back. Don't cover all the bright greens from the first pass.
Tying It Together
- Add a few very pale rows across the back fields with natural sienna to suggest furrows.
- Glaze a touch of warm yellow over some foreground flowers to suggest cast shadows — very dilute, softened immediately.
- Splatter with warm yellow, deep yellow, and a touch of orange across the whole painting to connect foreground and background. Cover areas you want to protect first. Soften any splatter on the background flowers with clean water while still wet.
- Add a few small dabs of cobalt turquoise or lavender — opaque — in the foreground only. These cool accents against all the warm yellows and greens make the colours sing.
Pen Work
Use dark brown ink sparingly on the shadow sides of the foreground flower centers only. A few marks, not a full outline. The pen should look like it isn't there. A white Posca marker or white gel pen adds a few small dots — pollen, bees, light catching petals — keep these minimal and scattered.
Resources...
* Reference photo
* Drawing to trace
Join me on Patreon
Join my Adventures in Colour Tier for $16 to access this post and my full library of over 200 others including deep-dive videos and step-by-steps.