 Video on Patreon
Old windmill
3 September 2026
Video - Level ◆◆◆
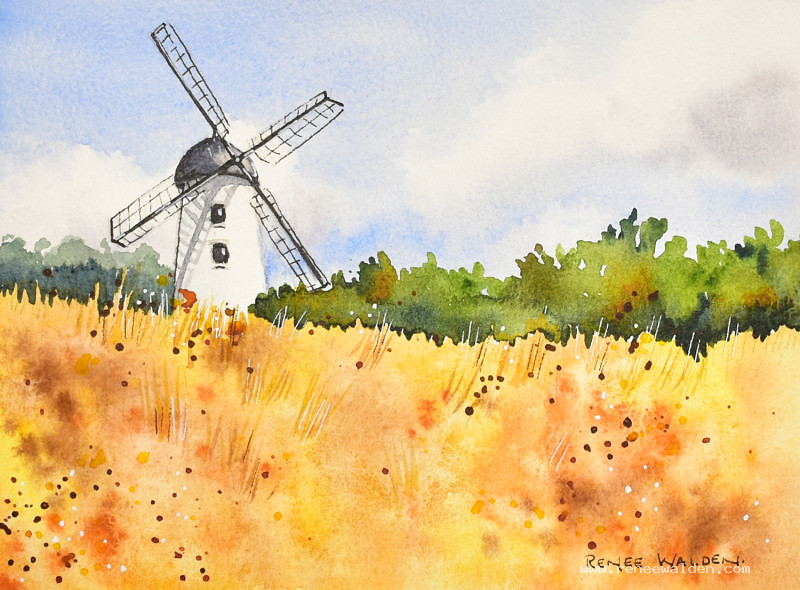
In this lesson we paint an old Danish windmill. It's such an interesting structure and I've placed it in a field of golden wheat.
This is a quick and easy painting, full of vibrant colours and late summer vibes. I hope you enjoy this one.
Happy painting!
Video run-through...
About This Painting
A windmill in late summer — warm wheat-coloured grasses, big puffy cumulus clouds, and the windmill itself placed high and off-centre as the clear focal point. The complementary contrast of the golden grasses against the blue sky does a lot of the work. Blooms create texture in the grass without painting a single blade, and negative painting pulls the grasses out from the bush line. The blades and wires are done with pen at the end.
A traceable drawing is available in the lesson description.
The Pencil Drawing
Use a ruler and start with a vertical centre line to keep the windmill symmetrical — it's easy to end up with a lopsided tower without one. Mark the cast shadow from one of the blades and the shadow under the cap; these will be painted, not drawn in. Add the grass lines and bush line once the windmill is placed correctly.
Colours to Prepare
- Cobalt blue — for the sky and as a base for shadow mixes
- Cobalt blue plus quinacridone sienna plus a touch of violet — pale gray for cloud shadows
- Natural sienna — the main grass colour
- Hansa yellow medium — warm accent in the grasses
- Quinacridone sienna and burnt umber — darker browns for grass texture
- Sap green — for the bush lines
- Indigo — for the darkest bush shadows
- Cobalt blue plus quinacridone sienna — light gray for windmill form shadow and cap
Sky and Clouds
Wet the entire sky with a flat brush, painting straight over the background trees and over the windmill blades (the blades are open lattice, and cutting around them creates halos). Paper towel in hand to catch any water that strays.
Drop cobalt blue in for the sky areas, working around two cloud shapes — one in the upper corner, one that the windmill tower breaks into. Pick out the bright cloud edges immediately by pressing a scrunched paper towel against the wet paint; each press creates the crisp silver-lining edge, and the dried paper stops paint from bleeding back in.
Mix the cloud shadow colour (cobalt blue, quinacridone sienna, touch of violet — very pale) and lay it along the bottom of each cloud. Soften the top edge of the shadow with a clean brush. The clouds should be darker at the top of the sky and lighter toward the horizon. Let dry naturally, then finish with a hair dryer.
Foreground Grasses
Use a large brush for coverage and a smaller one for pulling out grass tips at the top. Work wet so you have time, and vary between natural sienna, Hansa yellow medium, quinacridone sienna, and burnt umber as you go — more detail near the windmill, looser further away.
Once the area is painted and starting to reach a damp (not wet) stage, create blooms by touching a very wet brush loaded with clean water into the surface. When the timing is right, the water pushes the pigment outward in organic shapes that suggest grass texture without any brushwork. Drop in some colour at the same time — natural sienna, quinacridone sienna, a touch of burnt umber — for more complex marks. Let dry naturally.
Bush Lines
Paint two layers of bush line — distant and near — with increasing saturation and detail.
Back bushes — mix cobalt blue with a little sap green for a pale, bluish-green. Hold the brush toward the back and make an interesting irregular top edge. Deepen slightly along the bottom with indigo, pulling downward to suggest grass tips underneath.
Front bushes — more sap green, darker and more saturated. Work in sections: lay in the green, then immediately pull the bottom edge downward into the grass area with a smaller brush to create the grasses-meeting-bushes transition. Drop in complementary browns and indigo for shadow and depth. Create blooms with clean water when the section reaches the right dampness. The shadow side is on the left.
Windmill: Body Form
Wet the entire tower and drop a very pale wash of cobalt blue and quinacridone sienna on the left-hand side only — just enough to suggest the cylinder is round. Barely any pigment. Let dry.
Windmill: Metal Cap
Mix a darker gray from the same two colours. Paint the whole cap carefully — it wraps around the top of the tower like a little hat. While still damp, lift colour from the right-hand side with a clean dry brush to suggest the metal catching sunlight. Add a slightly darker line on the left edge.
Cast Shadows
Mix the same gray, much paler, with a little more blue. In one continuous pass if possible, paint the cast shadow from the blade across the tower face, and then the shadow under the cap. Add the thin shadow lines from the wires. These need to feel like one connected shadow, not separate marks — try to do them without lifting the brush.
Grass Details
Pull out a few individual grass stems with a dagger or rigger brush in natural sienna and the other grass colours. Keep this very restrained — the blooms have already done the work, and it's easy to overdo this step. Focus any extra grass detail around the windmill.
Pen Work and Final Details
Dark brown ink for everything on the shadow side: window sills, the left edges of the tower, the underside of the cap. Use a very light touch on the blade wires so they look fine and metallic.
Draw the blades with the pen — use a ruler if needed. A light hand keeps them from looking too heavy.
White gel pen picks up highlights on the cap and can correct any wobbly pen lines by painting over them.
Splatter with yellow, then a darker brown, around the focal point only — vary the height for different mark sizes, and avoid an even spread. Finish with a few white dots or white gouache splatters for sparkle. Remove the tape.
Resources...
* Reference photo
* Drawing to trace
Join me on Patreon
Join my Adventures in Colour Tier for $16 to access this post and my full library of over 200 others including deep-dive videos and step-by-steps.