 Video on Patreon
Autumn leaf
8 October 2026
Video - Level ◆◆◆
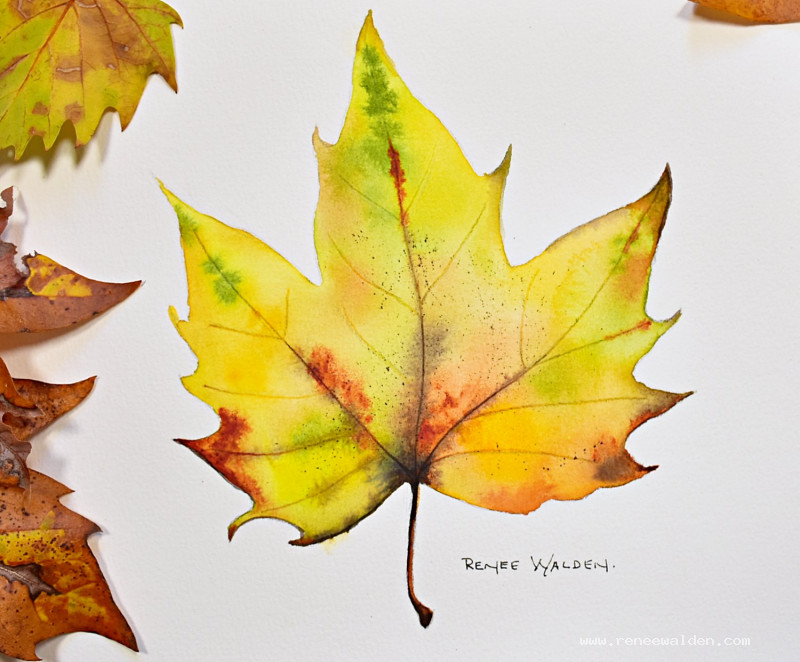
Here's a really good beginner watercolour lesson - one single, large autumn leaf, full of vibrant colours.
It's a simple subject so that I can show you how to practise brush, wetness and colour control. We'll paint wet-into-wet, wet on damp, dry on damp and all the stages in between. You can use my leaf for this lesson, or pick your own and work from that. Try this with different leaves, not just autumn ones - it's an excellent way to learn how watercolour moves and blends in it's different stages.
To make the most out of the skills in this lesson, work quite large, even if you have to scale up your leaf larger than life size. This will mean that your leaf will move through the various stages of drying more dramatically than it would if your painted area is quite small.
Happy painting!
Video run-through...
About This Painting
A single autumn leaf — deceptively simple, but packed with technique. This lesson takes you through all four stages of paper wetness in one painting: wet-into-wet for soft blended colour, wet-on-damp for slightly more controlled marks, pushing in veins with a tool at the damp stage, and finally dry-on-dry for sharp final details. It's excellent practice for understanding how water on the brush relates to water on the paper.
A traceable drawing is available in the lesson description — or collect a real leaf and trace around its shape.
What You'll Need
A dotting tool (nail art tools work perfectly) for pushing in the veins while the paper is still damp. You can substitute the back of a brush handle, the corner of an old credit card, or a mechanical pencil with the lead retracted.
Gather a few real autumn leaves to use as colour references. Put them in a plastic bag in the fridge overnight to keep them supple and colourful — they'll last much better than if left out.
Colours to Prepare
Mix more colours than you think you'll need, and have them ready before you start — you'll want to work quickly in the early stages.
- Hansa yellow medium and Hansa yellow deep — bright base yellows
- Quinacridone gold — rich golden amber
- Quinacridone sienna — glowing autumn red-brown
- Green gold — warm yellow-green
- Sap green — cooler green
- Sepia — deep warm brown for veins and dark areas
- French ultramarine — mixed with sepia for the darkest darks near the veins
Wetting the Leaf
Use a large brush to wet the entire leaf shape generously, including the stalk. Switch to a smaller brush for the sharp points and corners. When you think it's wet enough, check from the side — you want an even sheen with no dry patches or puddles.
Let the water sink into the paper for a minute, then wet again. The goal is to have plenty of working time. If your paper is warm (from a previous hair dryer session), it will dry faster — keep an eye on it and re-wet if needed. 100% cotton paper holds moisture much longer than student-grade paper.
First Pass: Wet-into-Wet
With the leaf fully wet, load your large brush generously and drop colours in gently — let the water on the page carry them where it wants to go. Work with a light touch; scrubbing will kill the luminosity. Don't aim for an exact result — use your reference leaves as inspiration, not a map.
Avoid making dots and dashes that are all the same size and spacing. Vary the marks. Start with the bright colours: yellows, greens, quinacridone sienna. The paper's wetness will dilute everything, so colours will dry lighter than they look now.
As different areas dry at different rates, notice: wet areas spread colour freely; slightly damp areas give a little more control. Drop sepia where you want vein lines, but wait until the paper is a little drier so it doesn't travel too far.
Pushing in the Veins
When the paper reaches the damp stage — still slightly wet but mostly lost its shine — use your dotting tool to indent the vein lines. Press firmly along the main vein and secondary veins, following the pattern of your reference leaf (each leaf species has a distinctive branching pattern, so look carefully). The colour should run into the indentations and create soft, natural-looking veins.
This is the same principle as a masking-free resist: the tool pushes the paper fibres down, and the colour pools there while the surrounding area remains as-is.
Wet-on-Damp: Adding Texture
As the paper continues to dry, thicker paint will stay more in place. This is the stage for:
- Blooms — touch a very wet brush loaded with clean water or a light colour into a damp area to push pigment outward in organic shapes (great for replicating the speckly look some leaves have)
- Tighter marks — come in with a smaller brush to sharpen the tips and corners
- Dark accents — sepia plus French ultramarine, quite thick, along the central vein and stalk
Work across the leaf as different areas reach this stage at different times. Once an area stops moving, leave it alone.
Splattering
Once the leaf is completely dry, protect the surrounding paper with paper towels or scrap paper and splatter with thick sepia. Tap the brush handle or flick the bristles for small, irregular speckles. A few are enough — this is a leaf, not a galaxy.
Final Details
With a fine brush (size 0), add any small adjustments: a touch of shadowing on the stalk, a little extra dark where veins meet, or sharpening a tip that went blurry. Keep this restrained — the goal is to accent the wet washes, not paint over them.
Clean up any paint that strayed outside the leaf outline with a clean eraser once everything is dry.
A series of these in different sizes and colours would look gorgeous framed together.
Resources...
* Reference photo
Join me on Patreon
Join my Adventures in Colour Tier for $16 to access this post and my full library of over 200 others including deep-dive videos and step-by-steps.